Crosswind Component Chart - Crosswind Approach And Landing Part Two

Crosswind Approach And Landing Part Two

Aircraft Performance Charts Part Three .

Calculate Crosswind In Your Head Minnesota Flyer .
Crosswind Approach And Landing Part Two .

Ubc Atsc113 Crosswinds And Headwinds .

How To Find A Crosswind Component 6 Steps .

How To Read Crosswind Component Chart .

Crosswind Approach Landing .

Runway Crosswind Calculation With Chart .

Crosswind Component Graph Aviationquotespilots Aviation .

I Need A Wind Component Chart Please Pprune Forums .

G450 Crosswinds .

Touring Machine Company Blog Archive Crosswind Component .

Private Pilot Lesson 9 Aircraft Performance Ascent .

How To Find A Crosswind Component 6 Steps .

A Landing You Can Walk Away From What To Know About The .

Reading A Wind Components Chart .

Crosswind Approach Landing Long Ca .

Aircraft Performance .

Learn To Fly Calculating Crosswind Component .

Flying N65995 April 2017 .

Ubc Atsc113 Crosswinds And Headwinds .

9 Questions To Understand Aircraft Performance Better .

Office .

Crosswind Landing Preflight Lesson Studyflight .

Aircraft Performance Charts Part Three .

Crosswind Calculations .

Crosswind After Landing Roll .

Solved Draw Lines On The Chart To The Right To Show Cross .

Runway Friction .

Phak Chapter10 Aeromanual .

Takeoff And Climb .

Chapter 9 Worksheet Crosswind Component Graph Usin .

02 Headwind Crosswind Component Youtube .

Activities Courses Seminars Webinars Alc_content Faa .

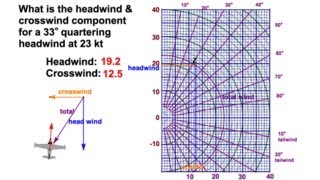
Crosswind Component Chart Crosswind Component Headwind 50 40 30 .

Crosswinds .

And They Called The Wind Wind Avweb .

How To Use A Crosswind Calculator Bobbie Lind .

Takeoff And Climb .

Calculating The Headwind And Crosswind Component All About .

Crosswind Component Chart .

Headwind And Crosswind Component California Flight School .

Crosswind Component Article About Crosswind Component By .

Airspace Navigation Flight Planning Airports .

Crosswind Approach And Landing Part Two .

Private Pilot Lesson 9 Aircraft Performance Ascent .
Winds .

Chapter 14 Airplane Performance Know Before You Go Pdf .

Zulucard Cross Wind Chart Item Number Zbl5 001 By Zulu .
- philips arena atlanta ga seating chart
- infant axillary temperature chart
- post 911 gi bill pay chart 2017
- nifty future chart analysis
- pokemon ultra sun island scan chart
- height weight age chart men
- nice guidelines bilirubin chart
- how to make a pivot chart on a mac
- saas bahu aur saazish trp chart this week 2018
- hand reflexology chart right hand
- alfred barr chart
- kabam field seating chart
- 12 hole alto c ocarina finger chart
- creative wedding seating chart displays
- el museo del barrio seating chart
- starbucks cup size chart
- frs gmrs chart
- sample gantt chart for project development
- itunes mexico charts
- search for truth 2 bible study chart pdf
- rainfall recording chart
- amazon book charts sales uk
- nasdaq ytd chart
- virginia tech depth chart 2018
- bone structure chart
- daily workout chart pdf
- dexcom arrow chart
- free printable braille alphabet chart
- ghc chart
- periodontal chart pdf